How to use the Rules Manager
There are a variety of rules that organizations can create to automate aspects of their business process: from auto-assigning work orders based on specified criteria, to auto-emailing notifications based on particular events, to escalating important items with time-based alerts or notifications. In this article, we will give an overview of the Rules Manager by briefly explaining the three parts of a rule: Event, Criteria, and Action. We will then illustrate how the Rules Manager works by building two separate rules: one that will send an automated Email upon the creation of a new work order, and one using the Escalation feature.
 Rules Manager overview: Event, Criteria, and Actions
To access the Rules Manager, select it from within the Tools menu.

This will open the Rules Manager dialog, displaying any rules already created. Once you have clicked New to create a new rule, or clicked Edit to edit an existing rule, the dialog will display a rule with three tabs that correspond to its three basic parts: Event, Criteria, and Actions.
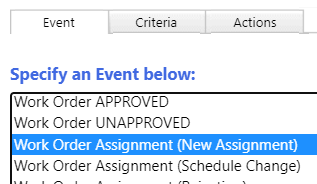
Event: All rules are triggered by a certain event taking place. Scrolling through the available event options reveals the variety of occasions that can trigger an automated action. For instance, selecting the New Work Order event will allow you to specify what actions or notifications should take place when a new work order is created.
Criteria: We can define criteria to "narrow down" the event that will trigger an automated action. For example, if you were to create a new rule using the New Work Order event, you could further specify that the rule will only apply to new work orders of a certain priority or type: such as a high priority, emergency work order.
Actions: Once an event is defined and the desired criteria has been added to make the event more specific, we can then specify the action to occur when the defined event takes place. These actions include a range of alerts sent via Email, text message, phone call, or in-app notification. You can also automatically create a labor assignment for a work order that meets the defined criteria.
Tutorial: Build an automated Email rule
One of the most common uses for the Rules Manager is to send automated Emails when a specified event meets defined criteria. In this quick tutorial, we will create a rule to automatically Email a shop supervisor when a work order has been issued to his or her shop.
- Beginning in the Rules Manager dialog, click New.
- Select the Work Order Assignment (New Assignment) event.
- Add your initials at the end of the Rule Name to distinguish it for us later on.
- Change the Rule Order to 1.
- Select the Repair Center that will manage the rule.
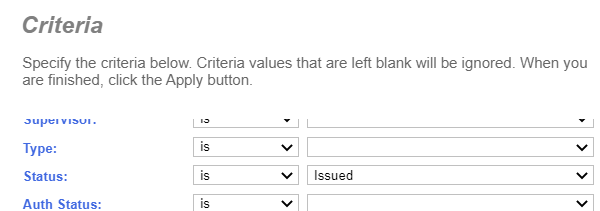
- Click Criteria, then Edit to open the Criteria dialog.
- Locate the Status field, ensure the operator is set to is and set the field to Issued. Click Apply when finished.
- Click Actions. From the options on the left, select Email.
- The Settings sub-tab will display. If the Email should be sent from a unique address, specify this in From Email Address. By default, it will be sent from agent@maintenanceconnection.com.
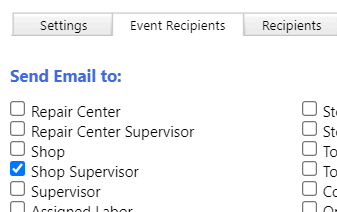
- Use the Event Recipients and/or the Recipients sub-tabs to designate whom the Email should be sent to. Event recipients are the records associated with the designated event. For this example, we want to send the notification Email to the shop supervisor associated with the new work order. To specify this, select Shop Supervisor in the Event Recipients sub-tab.
- If desired, use the Recipients sub-tab to input individual Email addresses to receive the Email. You can also set up and designate Email groups in this sub-tab.
- Before composing the Email message or adding attachments, you will need to save the new rule and re-access it. Click Save.
Warning: New rules can be executed in the system even before you save them. For example, an auto assignment rule will assign a technician to work orders that meet the specified criteria of the rule, even if you have not completely set up the rule as desired. To avoid this, un-check the Rule Enabled? box at the top right of the dialog. When you're done setting it up, click the checkbox again, and then save the rule.
- Saving the rule will navigate you to the Rules Manager dialog. Double click the new rule in the list.
- Select Actions > Message (HTML). Message (Text) can be used to insert plain text into the Email, as it is designed for recipients who cannot view HTML Emails, whereas Message (HTML) is designed for recipients who can view HTML Emails.
- You will notice that a default message populates in Message (HTML). This can be modified as necessary.
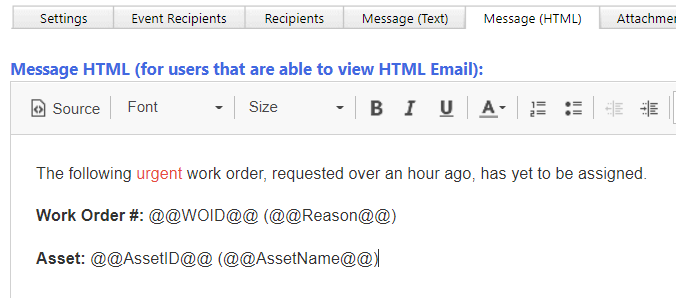
Tip: There are three Call Out fields designated in this Email (Work Order ID, Work Order Reason, and Assigned Date), as indicated by the double @ marks before and after the field name. These Call Out fields will insert proper information for the given record, thus giving as much as detail as possible to the Email recipients. Those receiving this Email would be able to see the new Work Order number, the Work Order Reason, and the Assigned Date for the Work Order. Please refer to the Rules Manager Call Out List article for a full list of fields that can be inserted into notifications.
- To include a link to a work order in the message, select Append WO Link.
- To attach a report to the Email, click Attachments.
- Under Attach the following Report(s) click the drop-down menu and select Work Orders (No Grouping). This is the Work Order Report/Printout associated with the given work order, so it is identical to the report displayed in the Report tab on the work order record.
- You can also set criteria for the attached report under Set Criteria using. In this example, set this to Event Record. In other cases, it may be helpful to use the same criteria given for the report in the Report module. To do this, you would set this field to Report (Saved Criteria).
- Select Display first Report in Email Body in order to ensure that the report displays in the body of the Email as well as an attachment.
- Click Save.
An Email will be sent to the shop supervisor any time a new work order is issued in associated with his or her shop.
Tutorial: Build a rule using the Escalation feature
Included in the Event tab are several Escalation events. Escalation events trigger rules based on time, giving you a wide array of options to escalate time-sensitive items automatically. This includes the ability to create rules triggered by elapsed time, allowing for important notifications when anticipated actions have not been taken. For example, a work order escalation rule could send a notification if a high priority work order was not assigned (or responded to) in a specified time window. Escalation rules can also work proactively to notify users of items requiring attention based on date criteria. For example, a rule could notify an administrator that an asset is within a month of ending its warranty coverage, prompting a check on the equipment prior to this date.
In this tutorial, we will create an escalation rule to support the following process: Every five minutes the system will look for urgent priority work orders that were requested more than an hour ago, but are still unassigned. Then, an email will automatically be sent to shop supervisors concerning any work orders that meet this criteria, alerting them to the need to assign the work order.
- Beginning in the Rules Manager, click New.
- In Event , scroll down the list of options and select Work Order Escalation.
- Add your initials at the end of the Rule Name to distinguish it for us later on.
- Change the Rule Order to 1.
- Select the Repair Center that will manage the rule.
- Escalation options will appear at the bottom of the Event tab. Specify the fields in this section as follows, taking notice of how each line corresponds to the screenshot below.
- Line 1: Set the first two fields to reflect our need for the system to look for certain work orders every five minutes. You can further specify the hours and days the system should perform this search. Because we would only want alerts/notifications sent during working hours, we will only have the system perform this search from 8:00AM to 5:00PM Monday through Friday.
- Line 2: Next, we want the system to find high priority work orders that were requested more than an hour ago, but are still unassigned.
- Line 3: Now we can specify if and when the action should be repeated if, after the initial action runs (i.e., the alert/notification about the unassigned, high priority work order), the condition still exists. We will specify that we want another alert/notification to be sent again every 30 minutes up to three more times.
- Line 4: Finally, it may be necessary at times to restrict the number of records that could be affected by the rule at one time. In this case, we will set the maximum number to 50.
- The Escalation specifications should look like this when finished.

- Now that we have set up the escalation parameters, click Criteria and then Edit to open the Criteria dialog.
- We want this rule to apply to urgent priority work orders that have not yet been assigned. To do this, set the Priority to 1-Urgent.
- Next, locate the Assigned? field and set it to No. Then, click Apply.

- Now, let's define the actions that will take place for this escalation rule. Select Actions. As with the above example, we will select Email from the options on the left and then select Shop Supervisor in the Event Recipients sub-tab. This will alert the shop supervisor associated with the urgent work order that it needs to be assigned immediately.
- Save the new rule. Once navigated back to the Rules Manager dialog, double click the new rule in the list.
- Select Actions and then select Message (HTML). We will input the following message:
- Save the new rule again.
The shop supervisor will receive an Email when the escalation rule conditions/criteria are met. If the work order remains unassigned after another 30 minutes, the system will re-send the Email to ensure the shop supervisor takes action as soon as possible.